Wind-up and Pitch
Mooney Stabilizer Pitch Trim
October 2015
This month’s Shop Talk will educate the reader as to how the Mooney stabilizer trim system works and what the associated parts are that make up this vital and very reliable system.
Your Mooney is not the only small airplane with a stabilizer trim system that moves the horizontal stabilizer to pitch up (stabilizer leading edge down) or pitch down (leading edge up).  The Piper Tri-Pacer and Cessna 185 are two common airplanes that use a mechanical jack screw to move the leading edge of the stabilizer up or down for pitch trim. What is unique about the Mooney system is that the jack screw is mounted horizontal (not vertical) in the tail cone and pushes out or pulls in the lower portion of the entire tail assembly. And the entire tail assembly, vertical fin, rudder, stabilizers, elevators, move as a unit.
A quick look at Figure 1, copied from the Mooney parts book, provides an overview of the system and how the components interact. Also, it is worthwhile for the reader to review a previous ShopTalk article about this trim system. Most previous ShopTalk articles are archived on our website, knr-inc.com. Look for March 2001, Free Play in the Mooney Tail.
Mooneys use two close-tolerance quarter-inch bolts with lock nuts on which the tail assembly pivots. That’s right, just two small bolts hold the entire tail on! Now that’s what I call aeronautical engineering. Al Mooney was a genius.
By moving the entire tail, the pitch change is considerable with very little motion of the Stabilizer Trim Wheel. Each Mooney model has a specific ratio between the Trim Wheel and the aft trim jack screw. A M20J has a different ratio compared to a M20M TLS/Bravo and even though parts may look similar, they are not interchangeable. Therefore, always verify part numbers against the appropriate Mooney parts manual. I have seen incorrect parts installed.
The pitch limits are also different between models. Set the stops to the correct standards as stated in the service manual for the model you are working on. I have also seen limits set for the wrong model.
Mooney has produced different Aft Control Trim Assemblies, so a trim screw and nut from a TLS/ Bravo will fit in a 1977 M20J but is not the correct part. Early trim assemblies used a flat roller bearing where later ones used a tapered bearing similar to wheel bearings (see Figure 2). Do not mix and match these parts, always use the correct part for your model and serial number airplane.
 Figure 2 shows an Aft Control Trim Assembly disassembled for bearing replacement due to corrosion. The grease used to pack these bearings must not freeze at high altitude so use AeroShell 6 or 7 (not 5 or some automotive junk). In the winter at flight level 250 it can easily be -35°F in a Bravo or TN or 252 in the tail cone. Another issue is each trim screw has a specific size shim in it to properly space the bearings for loading purposes, so do not mix up the placement of this shim(s) as it may bind when operating the trim in-flight under load. It may work fine on the ground but with flight loads it may become next to impossible to change the trim. The shims are placed between the bearing races and the housing.
In Mooney cockpits, between the front seats is the Stabilizer Trim Wheel. Immediately to the left of the wheel is a plastic cover, hiding a sprocket and chain. Always make sure this simple cover is installed and intact, preventing any objects from falling into the works. A pencil jammed between the chain and the lower sprocket may turn an approach and landing into a final one.
The basic operation of this system is simple. When the pilot moves the Stabilizer Trim Wheel in the cockpit, that rotational force drives, via chain, a sprocket under the floor which rotates a worm screw on which the pitch limit stops are located. See Figures 1 & 3. These stops are adjustable and with the Trim Indicator Nut, limit the travel of the stabilizer. Connected to this Trim Indicator Nut is the Trim Indicator Cable that drives the stabilizer trim indicator. The indicator must be checked when the pitch is in neutral to verify proper takeoff position. This cable is adjustable at the Trim Indicator Nut.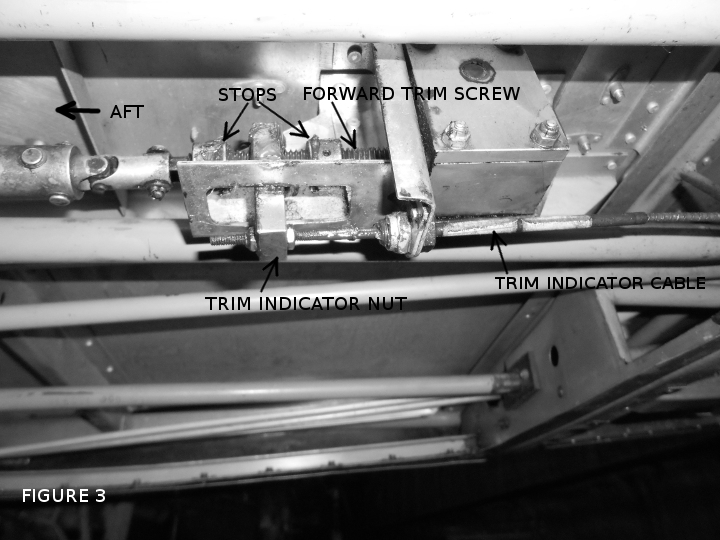
The Forward Trim Screw is coupled to the Trim Nut Assembly using multiple lengths of hollow aluminum tube and universal joints that run down the centerline of the belly under the floors.
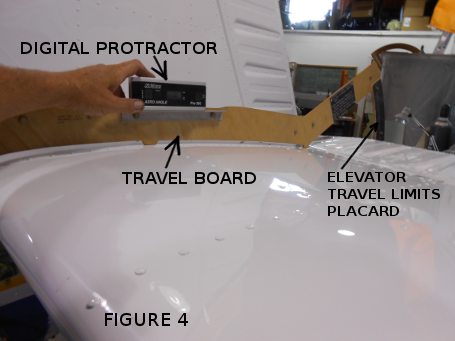
The stabilizer trim system can only be checked accurately using the appropriate Mooney travel board with the airplane on jacks and leveled as per the service manual. The travel board has a metal angle on which to place a digital protractor. See Figure 4. With the airplane level and the protractor level on the travel board set the take-off position on the Stabilizer Trim Wheel and verify the indicator in the cockpit is correct.
Use a digital protractor and travel board to find and set the nose up and nose down limits by adjusting the stops on the forward worm screw directly under the Stabilizer Trim Wheel.
It is not uncommon to find someone has disconnected the Forward Trim Screw from the Trim Nut Assembly and turned one or the other, then reconnected them out of rig. This cannot be corrected with just the stops. Using the travel board and digital protractor, set the maximum nose up position. Then disconnect the torque tube from the Forward Trim Screw and set the Stabilizer Trim Wheel to maximum nose up, then reconnect the system and start the rigging process from the beginning.
On Mooneys with electric trim, the motor and its chain drive will be located in the tail cone just aft of the avionics racks. A sprocket is fixed to the hollow aluminum torque tube that drives the Trim Nut Assembly and rotates the tube when you engage the electric trim. There is no rigging of this component except to allow a small amount of slack in the chain. Oil the chain periodically as needed.
On a placard attached to the travel board are the limits for elevator travel. Now is a good time to set the trim to neutral and verify you have the correct amount of up and down travel and that both elevators are at the same deflection angle when the trim is in neutral. It is not unusual to find a Mooney that has one elevator up 2 or 3 degrees higher than the other elevator. Your Mooney was not this way when it was new and yet can be out of rig and still seem to fly straight. Long time readers will know that I have written articles about proper rigging of the flight controls. This is a pet peeve with me, so get the rigging corrected if it’s out of whack.
Servicing the bearings in the Aft Control Trim Assembly is a rare event as the Assembly is sealed and unless someone uses a power washer back there (during paint stripping?) your airplane may never need to be disassembled . The Trim Screw/Nut part is visible if one removes the side inspection panel and the flexible boot covering the parts. Cleaning and lubing with AeroShell 6 or 7 is advisable and if you operate off of dirt runways often, it may be an annual event.
During an annual, the Stabilizer Trim Wheel chain and worm drive may need cleaning and light grease along with cleaning and lubing the indicator cable at the Trim Indicator Nut attach point .
One thing regularly seen is the aluminum torque tubes that drive the Trim Nut Assembly have shrink tube on them as they go through fairleads in the belly. Over the years this shrink tube may become loose and work its way aft leaving the tube unprotected from rubbing on the fairleads, possibly scoring the drive tube. To correct this, clean the shrink tube and the aluminum tube of all grease and inspect them for proper condition. If all looks good, glue the shrink tube back in the correct place on the aluminum tube to protect it from rubbing.
One thing I must convey, DO NOT ATTEMPT THIS JOB WITHOUT THE PROPER SERVICE MANUAL AND TOOLS! You may not be successful and will end up taking it to a mechanic that has the tools and expertise in this area. Proper stabilizer trim is very important and a matter of safety.
As always, if you have a question about this article, contact me at my aircraft repair shop: 307-789-6866 or via e-mail. Until the next ShopTalk, enjoy flying your Mooney.
