Vacuum Pump Seals
April 2014
This edition of ShopTalk is written for mechanics, but should be of interest to pilots or owners. Specifically, it will discuss the replacement of the vacuum pump seals on a TSIO 360 MB or SB series engine. The TSIO 360 MB or SB is unique to Mooney 252 and Encore aircraft. If there is a minor but messy oil leak at the back of the engine probably the T-drive is leaking.
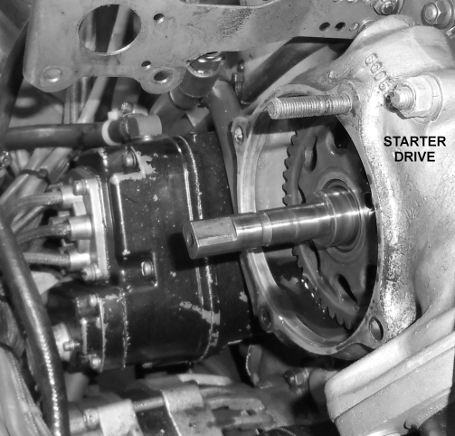
This T-drive was designed to power both a vacuum pump and either a Freon compressor or a second alternator via a belt and pulley system. The power train begins as with other TSIO360 series engines with the starter drive bolted to the back of the engine case. The turbocharger scavenge pump is then bolted to the starter drive and is driven by the starter drive gear coupled using a Woodruff key. This shaft then extends farther aft towards the firewall and has two flats at the end. These flats engage into the first bevel gear in the T-drive. This gear would not be on the non-T-drive engines as their vacuum pumps would be driven directly from the starter drive gear. This arrangement generates less stress than the T-drive; non-T-drive engines rarely need a new vacuum pump seal.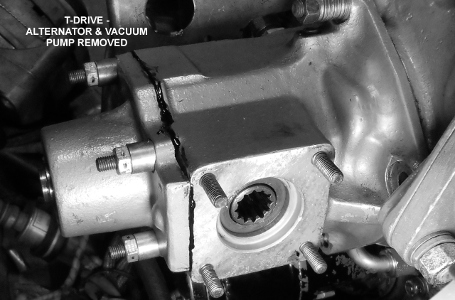
As the engine fleet ages, many parts are being overhauled and are losing new part tolerances. This seems to be the case with T-drives which contributes to leaking seals
Seal replacement is not a job for the faint-hearted. Not only will it require about eight hours to complete but a mistake here during reassembly could easily lead to the destruction of the engine. So, follow along for a step-by-step description of determining if the T-drive is causing an oil leak and then how to fix it. Note: For this replacement you must be a FAA certified power plant mechanic and have all the TCM manuals. This is a complicated, critical job and personally, I would never oversee a pilot/owner doing it (nothing against pilots/owners).
Is the T-drive the culprit? There are two clues: First, wipe clean fingers under the vacuum pump. Second, place clean fingers under the end of the T-drive where the pulley is bolted on. These are the two spots where the T-drive typically leaks. If both these areas are dry, you are in luck and probably a magneto gasket needs replacing.
 Once determining the T-drive is leaking, what’s the first step? Working indoors, pull off both cowlings and remove the intercooler. Cover the turbo-compressor air pipe so nothing can fall in. Pull both alternators' field circuit breakers to prevent accidentally shorting out a regulator. Remove the second alternator. Next remove the alternator pulley by loosening the reverse‑threaded bolt in the center - hold the prop so it doesn’t turn. Remove the vacuum pump and its adapter as one unit, then separate them on the bench for cleaning.
Next, remove the second alternator's brackets, engine lifting ring, the turbo-charger suction line, the throttle bracket at the crank case and both alternator cooling hoses at the engine baffle. Separate the T-drive from the starter drive, The T-drive uses an O-ring to seal it to the starter drive so a little muscle may be needed to separate the two. Take the T-drive to the bench.
With the T-drive on the bench, separate the T-drive end cap and remove the side cover plate. If the seal is leaking, oil will be inside the cover plate. At the end plate, a silk thread provides the oil barrier. If it is not intact, the T-drive will leak oil.
To remove the seals, remove the snap ring at the base of the bevel gear and slide the shaft out away from the vacuum pump seal. There are two Woodruff keys you must not lose. One is on the starter drive shaft which drives the turbocharger scavenge pump. Place the prop to a position so this key is at the 12 o’clock position so it won’t fall off the starter drive shaft. The second key is square shaped, located on the shaft that rides on the seals being changed. This is a good time to clean up the back of the engine for any oil mess. Are we having fun yet?
 Next pop the two seals out of the T-drive and clean up all the parts. Using a press, push in two new seals (they are not identical). Remove the O-ring on the T-drive assembly and test fit the assembly to the engine making sure the turbocharger scavenge pump gear is engaged to the Woodruff key on the starter shaft. Once this fits properly, remove the T-drive and install a new O-ring on the turbocharger scavenge pump. Using some grease on the O-ring, reinstall the T-drive. Install the first bevel gear on to the starter shaft flats with plenty of grease (AeroShell 5 works well).
Grease the seals in the T-drive and the second bevel gear, install the shaft into the bevel gear square key with the snap ring in place, push the shaft all the way into the vacuum pump seal. Make sure the snap ring is engaged in its groove next to the second bevel gear. Now comes the fun part. Referencing TCM SIL 99-2B or the latest version, thread and seal the end cap after greasing the third bevel gear. Rarely does the end cap seal leak, so normally it will not need changing, but if there is any question just change it. Never deviate from the instructions in TCM SIL 99-2B or you will have a leaky T-drive.
Make sure that the correct spacers and safety wireable nuts are used to hold the alternator bracket on to the T-drive. I see all sorts of combination of incorrect parts here and I think that is one reason the end caps leak oil. When one looks at the weight of rotating mass held by the alternator brackets it is not hard to see the T-drive end cap fretting and eventually breaking the thread seal. Reinstall the aft alternator bracket and engine lifting ring. Don’t forget to safety wire the three bolts that secure these brackets. It’s not a bad idea to put some Permatex 2 on the threads of these bolts. Reinstall the cover plate with a new gasket for the T-drive oil seal (pilot's side) and throttle bracket to the crank case and T-drive. Always use new lock washers.
Torque the four T-drive end plate nuts to their correct torque and safety wire as soon as you reassemble the engine, don’t wait until tomorrow to do this. Reinstall the scavenge hose to the turbocharger scavenge pump. After cleaning the vacuum pump and its drive adapter, grease the spines on the adapter and reinstall both with new gaskets as an assembly on to the T-drive. Reinstall the second alternator and vacuum pump hose.
Install the alternator pulley (on the T-drive) and the reverse threaded bolt and torque to the proper value. Set the alternator belt tension and reinstall the cooling hoses for both alternators. At this point you are probably wishing the oil leak had been due to a magneto gasket. However, we are almost done.
With all the oil mess cleaned off the engine and airframe, perform a complete engine run-up to verify the scavenge and vacuum pumps are working properly. After the run-up place your fingers under the T-drive to make sure there are no oil leaks.
In 1979 when I was a young A&P we rarely saw these types of items leaking; the engine and airframe fleet was young with mostly new parts used and fewer used parts in service. Now, new parts are very expensive and used serviceable parts are the norm.
As always if you have any questions about this article feel free to contact me at my aircraft repair shop: 307-789-6866 or via e-mail. Until the next ShopTalk, enjoy flying your Mooney.
