Beech Sierra Landing Gear Disc Replacement
ShopTalk
June 2023
This ShopTalk article will take the reader deep into the issue of main landing gear shock disc replacement on Beech retractable gear Sierra series aircraft. I know most readers of ShopTalk are used to reading about how to maintain aging Mooney aircraft but over the past 23 years of writing articles I have written about Piper aircraft also.
Beech C24R Sierra aircraft are 200HP low-wing retractable gear airplanes with a roomy cabin and a door on each side plus a rear door on the pilot’s side for entry into the 5th and 6th seats. For shock absorption and dampening, Beech Sierra and Mooney aircraft, use Lord J11968 series shock discs. Where the Mooney uses the -14 shock disc and only 4 per main landing gear, the Beech uses a ‑10 shock disc and 8 per main landing gear.
Like the Mooney, the C24R disc installation requires a special tool kit to compress the new discs (see picture).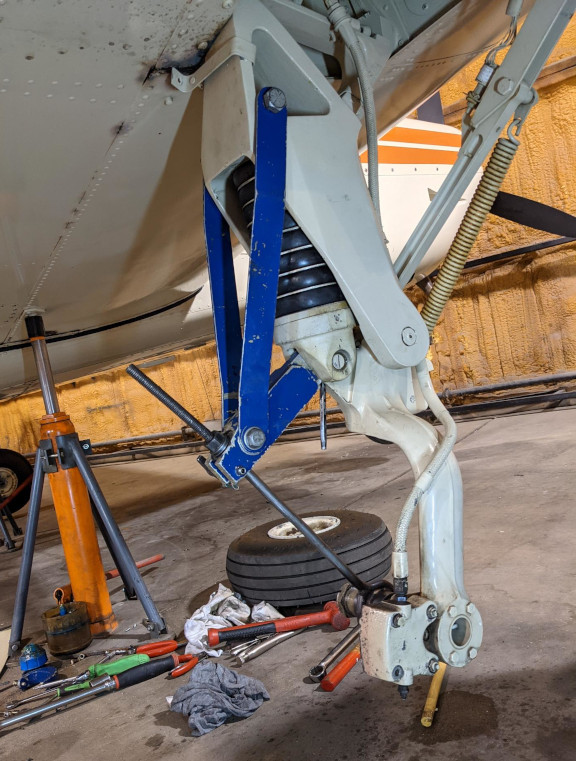
If you can’t borrow one, the tool kit, #169-810031rent, can be rented from your Cessna or Beech dealer (both are now under the Textron umbrella) for under $600. This job can't be done without this tool. KNR, Inc. also manufactures a disc compression tool kit available for purchase – [KIT]. This work should be performed by an appropriately rated FAA airframe mechanic whose signature is required to return the airplane to service.
All Lord shock discs will have the part number embossed into the rubber and just after the part number will be the date of manufacture. By reading this date one can tell how old the discs are. On a Mooney, it is not uncommon to have to replace these discs every 10 years on short-body airplanes and every 5-6 years on long-body airplanes, so anything over 10 years might need replacement.
Once you have ordered and received the 16 shock discs ($130 each) and have the Beech or KNR compression tool kit, KT810031 [KIT], you will still need a 1-7/16” box-end wrench to remove the nut on top of the disc stack along with a ½ inch Allen wrench (½ inch drive) to remove the gear retraction side brace, as these tools are not in the KIT. You will also need a 3-foot cheater bar to leverage the 1-7/16” wrench for nut removal and installation.
Now that you have all the tools and the correct Beech service manual, the first item is to remove the main gear door. Do this job in a hanger, out of the wind, as the plane will be on jacks for two days. The next step is to remove the nut on top of the shock disc stack along with the washer under the nut. Now place the aircraft on jacks and remove the main wheel. The next item is to remove the lower drag brace bolt and spring by using the 1/2” Allen wrench and the nut on the front side of the disc stack (3/4" open-end angle wrench). Leave the spring on its attach stud and remove the stud from the gear leg.
Remove the 1/8" clevis pin that secures the pin holding the disc stack to the gear leg. Using the KIT’s U-shaped press tool, remove the large pin that secures the shock disc stack to the gear leg. Note there are shims between the gear leg and the ears on the disc stack. Note the position of these shims as they can be of different thicknesses.
Now we can remove the disc stack assembly and remove the old discs. Clean up all the parts and put a small amount of grease (AeroShell 5) on the stem that holds the new discs. We put the new discs on so one can read the part number and date code once installed. Grease the pin and the bushings as well as the shims before re-assembly of the pin and gear leg. Make a mark with a Sharpie on the end of the pin that corresponds to the angle the 1/8" clevis pin is drilled in the large pin. Start this pin into the first ear on the disc stack and align it with the clevis pinhole. Place the disc stack in the upper gear casting and put the first shim in place.
Tap the pin into the lower gear leg just enough to install the shim on the other side and then install the shim, then tap the large pin in place while aligning the clevis pin to go through the lower leg and the large pin you just tapped in place. Once the 1/8" clevis pin is in place, you may not be able to install the washer and cotter key until the discs are compressed so the nut with the washer will fit on the top of the disc stack. Make sure this clevis pin does not fall out while compressing the discs.
Now install the compression tool per the drawing supplied in the KT810031 tool kit. Make sure to install the rubber hose on the shaft of the bolt that holds the top of the compression tool to the top of the upper gear leg as not to damage the magnesium upper gear leg. Place a finger into the top hole where the shock disc rod will stick through into the upper gear housing and align this rod so it will pass through the hole while compressing the discs and not damage the upper gear housing.
Compress the discs until you can fit the washer and 1 7/16" nut on the disc stack rod on top of the upper gear housing. Thread the nut on until it reaches the nylon lock portion of the nut. Remove the KIT compression tool. Next, install the washer and cotter pin for the 1/8” clevis pin. Re-install the spring and lower drag brace for the landing gear.
Now put the wheels back on and secure them in place, re-install the main gear door, then take the plane off of the jacks. We are explaining only one side, but you should be doing both sides at the same time. With the weight of the plane on its wheels, tighten down the 1 7/16" nut until the disc stack is 6.5" tall (about 7-9 threads showing through the 1 7/16" nut). Be sure the main tires are inflated to the correct air pressure Beech calls for in the service manual for the plane you are working on.
Now place the plane back on jacks and do a retraction test to make sure the wheels clear the wheel well and fit with ½” clearance around the front of the tire and wheel well. Tightening the 1 7/16” nut will pull the wheel aft; a maximum of 6.5” height on the entire stack is desired. If the stack is taller than 6.5” the wheel may be too far forward to fit into the wheel well correctly.
Once you are sure the wheels clear properly, take the plane off of the jacks, and complete a log book entry for the job you did. Remember, an appropriately rated FAA airframe mechanic needs to return the airplane to service. If it all went as planned, this job should take about 14-16 hours to complete.
If you have any questions regarding this article or any other ShopTalk articles, feel free to contact me via E-mail, shoptalk@knr-inc.com, or the old-fashion way of calling our aircraft repair shop at 307-789-6866. All other ShopTalk articles can be read at knr-inc.com. Until the next ShopTalk enjoy flying your Beech Sierra.