CESSNA 182 RESTORATION
ShopTalk - September 2022
By Kerry McIntyre
In this month's ShopTalk, we will take the reader through the extensive and expensive journey of the restoration process for a Cessna 182 single-engine airplane. This article will be broken down into seven basic chapters to clarify this process. These chapters are as follows:
- Introduction
- Avionics
- Instrument panels and instruments
- Airframe-windows and rigging
- Interior
- Finish items for airworthiness
- Paint
CHAPTER 1: INTRODUCTION
The first important item to consider when looking at a restoration candidate is, does this aircraft have "good bones", as I like to call it. As our general aviation fleet ages, it is getting harder to find an airplane worthy of the time and money to restore. Over the years, airplanes have risen in value but so have parts and service costs.
What do I look for when I say "good bones"? First, are all the log books for the airframe back to the day it was manufactured new there? Second, are all the log books for the engine back to the day it was manufactured new there? Finally, are all the log books for the propeller back to the day it was manufactured new there? FAR 91.417(a) clearly states, that during each annual one must determine and record the total time of each airframe, engine, and propeller. This is the first item of good bones. Without this, everything else is irrelevant when it comes to the value of the aircraft you are restoring.
The second item of "good bones" is airframe total time. The lower the total time the more valuable the aircraft will be on the open market. The third item is damage history. Now when restoring a tail wheel aircraft this item is somewhat moot, as most tail wheel aircraft have been ground looped at one time in their life, so we look at how intense was the damage history and how recently it happened.
All of these "good bones" items will dictate the market value when you go to sell the aircraft and they must be taken into consideration before investing a year or more and 100K or more to restore a single-engine aircraft.
With all that said, some aircraft markets are stronger than others. It would be hard to justify restoring a Bellanca Viking as compared to a Cessna 182. The 182 is a more marketable aircraft to the masses even though the Viking is a faster cross-country aircraft. The 182 is a more robust aircraft and because it is an all-metal aircraft as compared to the Viking (that is wood and fabric) the 182 can sit outside in the weather with fewer complications from rain or snow. More pilots can easily qualify to fly a 182 than the requirements to fly a Viking. Look at the market value of the aircraft in question, before jumping into a restoration.
With our introduction, complete with warnings, it's time for chapter 2, avionics.
CHAPTER 2: AVIONICS.
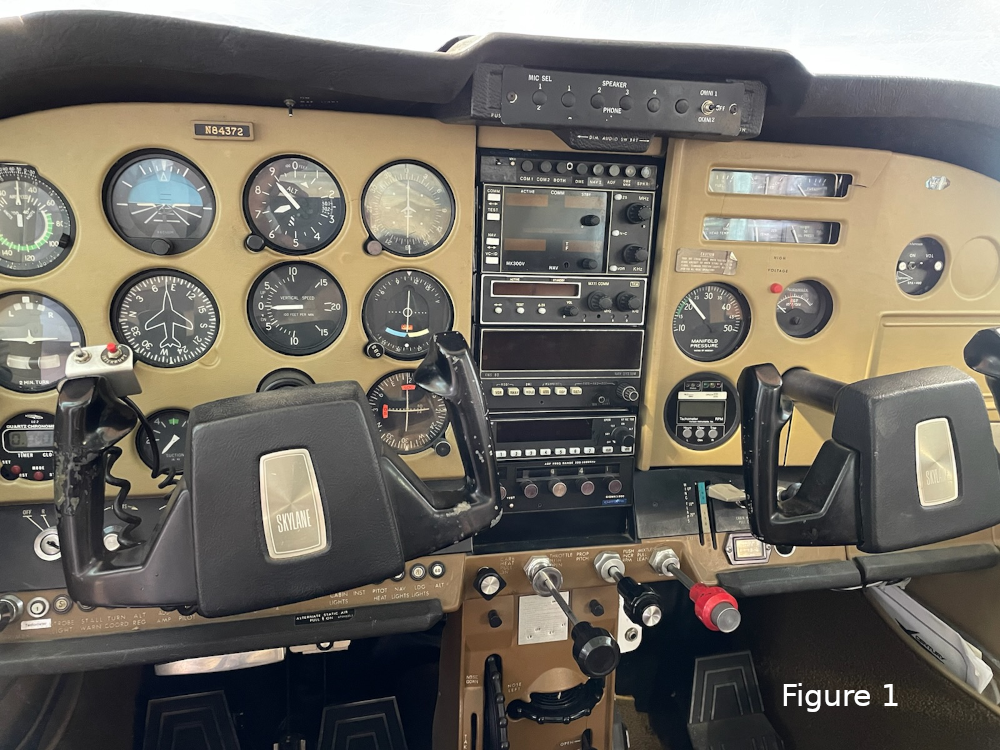 If one looks at the avionics package that this C-182P came with (see Figure 1), it is obvious that there is nothing here to work with; nothing. It has an inoperative autopilot, an old Century 1 that was outdated in 1973 when this plane was new. The radios are a mishmash of old and older junk. The audio panel is useless and most airplanes gave up on intercoms 30 years ago.
As with all restorations, there is a target final price to meet the current market value and there is the "I want it all and price is no object" dream avionics package. Let's first look at what a Cessna 182P will be used for 80 percent of the time, and that is not hard IFR all weather "gotta go" operations. Most of this type of airplane's life will be spent flying around on sunny days from point A to point B. Remember, flying is supposed to be fun, not a workout when flying a single piston engine bug smasher.
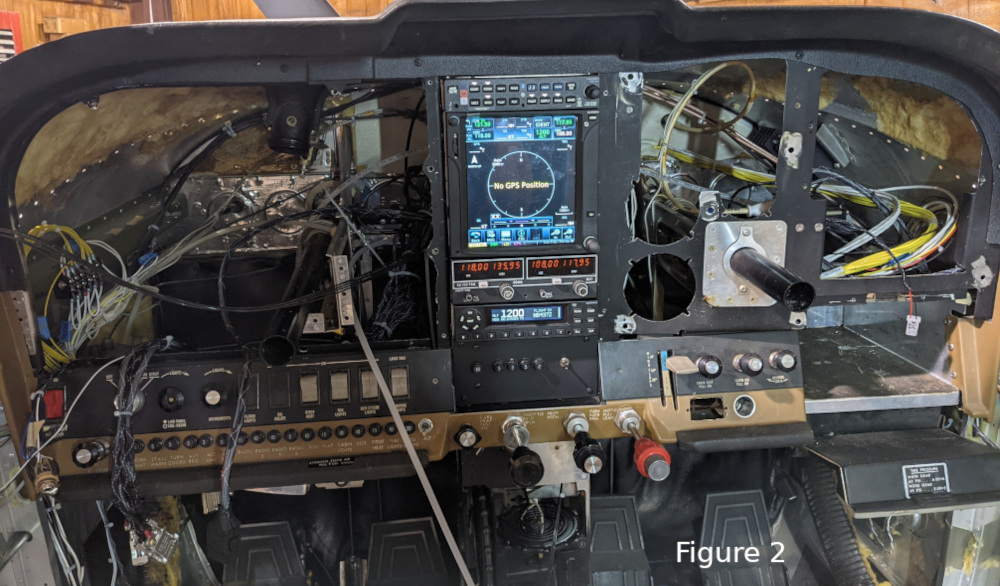
You will want enough avionics capability to fly IFR and an autopilot that won't break the bank but will work with the GPS/ nav radios you plan to install. Other creature comforts can be found in the audio panel. Some items everyone wants are, Bluetooth communications in flight from your phone, intercom to all four seats, pilot and crew isolated from passengers talking, and perhaps being able to change screens on the GPS with a push of a button on the control wheel and voice command. Music is nice also. We chose a Garmin GMA350 audio panel. (Figure 2. I want to show you the complexity of what is behind the panel.)
 Believe it or not, these items can be found in today's modern audio panels and they are bargain-priced at under 2500 bucks. What type of autopilot will best suit the capabilities of the plane under restoration? Do you need altitude pre-select and hold in a non-turbo piston single-engine airplane? Of course not. Would I recommend a simple analog STEC 20 autopilot for a Mooney TLS Bravo? Of course not, but it is perfect for a 1973 C 182 and it is priced right so one can have more money to put into other items that will be necessary for this restoration. The STEC 20 or 30 is plenty of autopilot for a Cessna 182 P, and you get a new turn coordinator at the same time.
The navigation radio is the number one priority here and we do not want to scrimp on this item. We choose a Garmin GTN 750 for several reasons. One, the screen size is fantastic and the Cessna 182 has plenty of panel space for it. Touch screen capabilities can also accommodate remote transponders and storm scopes They are no bargain at 18K, but the money you saved by not installing a 30K autopilot is well spent on the GTN 750. This is the radio to connect to the autopilot. It will fly the GPS, VOR coarse perfectly. Avidyne has some very capable radios but it's hard to beat a GTN 750.
The number two radio is basically a backup and a secondary navigator to ease the pilot workload and verify the first navigator's accuracy. Here we do not need to break the bank, just a simple King KX155 with VOR capabilities is enough to get the job done. These radios have been around since 1979 and are very reliable. They are still supported by MidContinent so they can be repaired easily. This radio need not be connected to the autopilot which keeps costs reasonable.
The final piece to the puzzle is the ADS-B transponder. Here we want to take advantage of in-flight weather and collision avoidance capability. The GTN 750 screen is large enough to accommodate the targets flying in your area and the weather you are headed into. This is where spending the extra money on the GTN 750 will pay off. It is very easy to clutter up a smaller screen with all these items but the GTN 750 will handle all of it.
We choose a Garmin GTX 345 ADS-B In/Out transponder along with a Garmin micro encoder that bolts to the back of the transponder tray. Remember all the old avionics including the encoder were analog junk. Don t cut corners here, the Garmin micro encoder is inexpensive and designed to work with the GTX series transponders. The GTX 345 will put information on your tablet and on the GTN 750 screen. The beauty of this capability is that tablets are cheap and the pixel capabilities are getting better with every new tablet. The GTX 345 can also be displayed on the GTN 750 screen so there is no need to reach down to change the transponder frequency as this can be done on the touch screen of the GTN 750. The pilot's workload becomes easier.
One more item to think about is the ELT. Satellites no longer look for 121.5 ELT signals but can find a 406 signal in under 4 minutes. The 406 ELT can be interfaced to the GTN 750 GPS giving out a position that is within 100 feet. We installed an Artex 345 406/121.5 ELT system interfaced to the GTN 750. When you are spending this much money on avionics, another 800 bucks will not even be noticed.
With all the vertical space in the C-182 primary radio rack, these 4 radios will easily fit in one neat stack. Since the autopilot is part of the turn coordinator there is extra room below the radio stack for more switches and circuit breakers. Ergonomics is a very important item for reducing the pilot workload. Think about the arrangement and how each radio will interface with the other radio(s) before proceeding with any avionics installation.
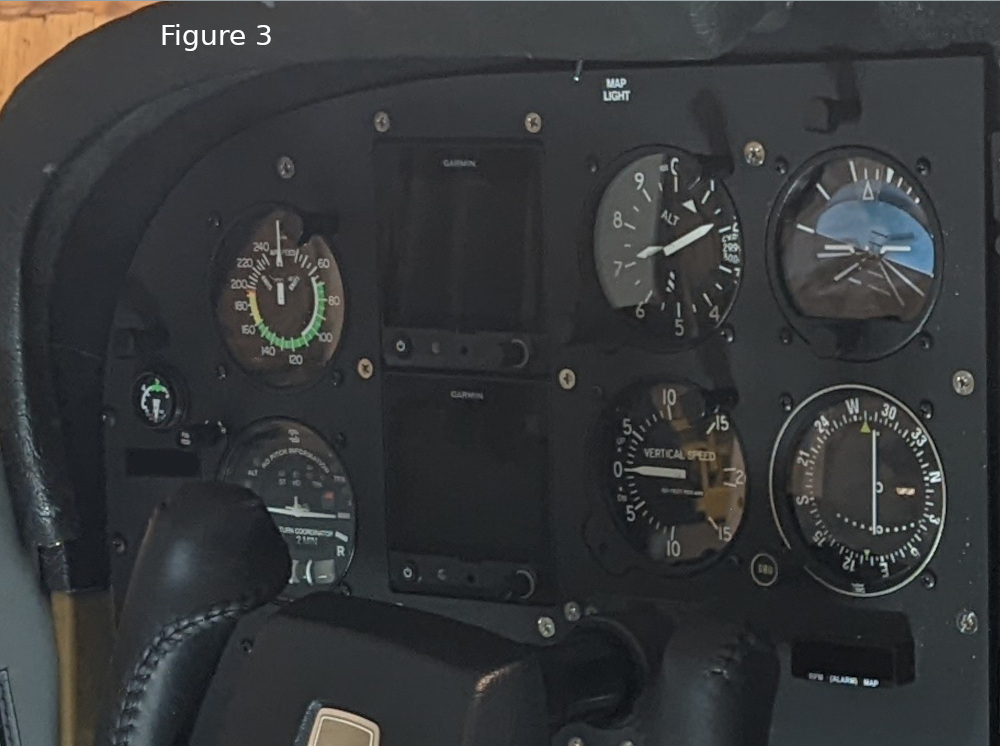 There are several ways to get a navigation head for your number one radio. In our case, we chose to replace the old vacuum gyros and interface dual Garmin G5s converted to an HSI system (Figure 3). The dual G5s are flush mounted and look very cool. Because the vacuum gyros were of no use when installing a GTN 750, it made no sense to keep them except for the attitude gyro as a backup to the electric indicators. Having an HSI also increases the value of the airplane when it is time to sell. This was not the most affordable way to go, a simple GI 106B nav-head will get the navigation job done but for another 7,500 bucks, you can have an HSI system and get all the capabilities from of your GTN 750. We will discuss the dual G5 indicators in the section on instruments and instrument panels in chapter 3.
So what will all of this cost in 2022 dollars? Better budget $55K for the equipment and another $20K for the removal and installation process. This will not include changing all the circuit breakers to modern pull type breakers and fixing all the dimmer systems and upgrading them to more user-friendly and night operation capability. Yep, $75K just spent in a heartbeat.
CHAPTER 3: INSTRUMENT PANELS AND INSTRUMENTS
Looking at the photo of the instrument panel in Figure 1, one can see this is about as original as it got in 1973. The plastic overlays of this era were functional when new but are now seriously outdated and damaged. You can still buy new plastic overlays but with all the money that went into the avionics in chapter 2, it would be a crime to not refresh and modernize both the instruments and instrument panels.
The first step is to remove all the instruments in the pilot's and co-pilot's instrument panels. Are any of the removed instruments reusable? Typically the altimeter and VSI along with the airspeed and attitude indicator can be sent out for overhaul and new silk-screen faces applied. Once the instrument panel is removed, the condition of the pitot and static lines and bottles can be evaluated. Since we are replacing all the avionics, all the wiring for the old avionics, the circuit breakers and fuses for said avionics can now be removed and discarded.
This is also a good time to replace all the old non-pull type circuit breakers for the basic systems. These breakers, like everything else, are almost 50 years old and it's anybody's guess if they will work when needed. We install Klixon pull-type circuit breakers of the same rating in place of the old non-pull type(s). New buss-bars are typically needed as the old ones have been bent over the years and will be aluminum instead of copper. Now is also the time to separate all the avionics circuit breakers from the master buss and install an avionics master switch powered by the master buss. Of course, your avionics circuit breakers will also be new Klixon pull-type breakers powered through the avionics master switch.
While the breakers are being replaced, let's clean up the dimmer systems for radio and panel lighting along with the glare shield lights (if installed). We will typically separate the systems and put them into individual CPC-type connectors, then verify the transistors are functioning correctly. Most of the time the EL panels (if installed ) are shorted out and not functional. We will isolate these systems and tie them off so they can't later interfere with the electrical system. Don't forget about the map light, overhead lights, and compass while fixing the lighting systems.
The next item is to install a central ground buss-bar on the side of the airframe inside the cabin, near the glove box area. One thing you will find as you clean up all the wiring is that Cessna put ground wires everywhere with no regard to a central clean location. When these planes were built new it did not matter about the ground system for two reasons: avionics of those days were not finicky about poor grounding and the aluminum was all new, not 50 years corroded.
Route all the ground wires that are still needed to the new ground buss-bar. We install all the grounds using a 16-pin CPC connector and run wires from the buss-bar to the opposite CPC connector. This makes for a simple ground buss-bar connection and allows for more ground wires to be installed at a later date. All of our radio ground wires will be run into a separate CPC connector and a separate buss-bar will be installed in the same location as the original buss-bar. Put in a big enough CPC connector for future expansion.
Let's take a moment to discuss the co-pilot's instrument panel and the fuel and engine instruments. When we look at the co-pilot's instrument panel we will see it needs the plastic cover or some type of overlay to cover all the extra holes Cessna cut in the sheet metal for optional radios.
We still are faced with the same problem as the radios in the fact that all the engine and fuel instruments are almost 50 years old and probably not very reliable or accurate. There are many different ways to solve this, but the reality is they are still old instruments even after overhauling them. The best way is to bite the bullet and upgrade them all with an STC-approved direct replacement system(s).
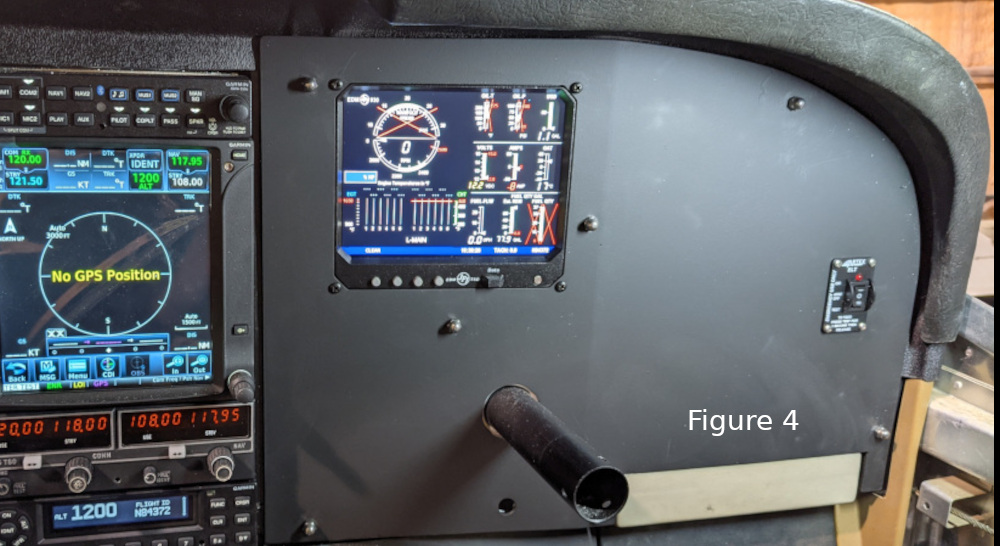 JP Instruments has probably been around the longest but Electronics International and Garmin also have direct replacement systems. I personally like the JP instruments EDM 930 display. It is a large display that is well thought out for ergonomics and can be installed on the co-pilot's panel. It has everything in one display that used to require 3 or 4 instruments and is basically indestructible (Figure 4). No matter what brand display you choose to go with, be sure to send the fuel transmitters to Air Parts of Lock Haven for overhaul or replacement. All of these new engine/fuel instruments are digital and old analog-type fuel senders that are corroded or worn out will give false readings or no reading when interfaced to the new displays.
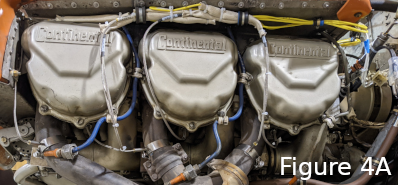
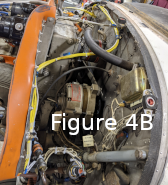 To interface with the EDM 930, each cylinder must have an EGT and a CHT probe installed (Figures 4A & 4B). In these photos, each probe cable is run up to above the cylinders where it is connected onto its respective yellow wires (probe & ground). Those wire pairs lead back to and along the accessory case, through the firewall and ultimately to the EDM 930.
We fabricate a co-pilot panel overlay using the same material as the new pilot's panel. Not just anybody may fabricate a new instrument panel and install it on a certified aircraft. This is considered an alteration to the type certificate of your certified aircraft and requires an STC or field approval to maintain your airworthiness status. To be legal, KNR holds an STC for new instrument panels along with a PMA for this type of work. All the materials used are tracked and certified. The new instrument panels are fabricated from 0.100” 7075T6 Alcad aluminum. We then powder-coat them with a custom satin color. All required placards are then installed to maintain airworthiness. If the panel was shock-mounted it must remain shock-mounted in the same manner as when first manufactured.
Unfortunately, we see aircraft with new instrument panels installed and no proper return-to-service paperwork for these new panels. We must turn these folks away if they want us to do an annual unless they want us to replace their unapproved instrument panels. Many avionics shops do not determine/verify airworthiness as we in the field do at an annual. Most of the IA mechanics, that understood any alteration to a certified aircraft must be properly documented on a 337 form, are now retired or out of business.
A lot of these CAR 3 certified aircraft of the 70s had poor panel lighting at best. We will typically get the original lighting back to working condition and then fill in the gaps with either Whelen post lights or NuLite wedge lights under all the unlit instruments. Most of today's modern radios have auto-dimmer systems but some King radios still need to be connected to the dimmer system in the plane. It was not until the mid-80s that manufacturers started installing internally lit instruments. Mooney was the front runner in this category.
Now is the time to replace the split master switch. Like everything else on a 50-year-old plane, this is one item that is fairly priced and very important. The Cessna master switches get dirty inside and will become intermittent. After doing all this work it would be a real bummer that one did not replace such a critical switch. If your magneto switch is loose and you can pull the key out in the ON position, then replace it also. This switch is not so reasonably priced but just as important if not more important than the master switch.
This is also the time to replace any connectors that are corroded or any wires that are chaffed. It will never be easier than right now and the object of this restoration is to get another 50 years of reliability out of our Cessna 182.
CHAPTER 4: AIRFRAME- ANTENNAS, WINDOWS AND RIGGING.
Part of the avionics installation will be replacing antennas and removing antennas that are no longer needed. When installing modern GPS navigation/com radios it will be necessary to replace the com antennas with new ones. It would be naive to assume that a 50-year-old antenna with a 50-year-old base for grounding would work properly. In the case of this Cessna 182, we knew the aircraft would go in for repaint after we completed the restoration. We stripped all the paint off of the roof to get a good ground bond for the two new com antennas. The WASS GPS antenna was installed on the roof in place of the ADF long wire base since the ADF antenna was removed. All 3 antennas were sealed with PRC sealant to keep dirt and corrosion out. Most new audio panels still have 3 light marker systems in them, so we replaced the marker-beacon antenna with a new one in the same location and sealed it with PRC also. The ADS-B transponder requires new coax (RG142) along with a new blade-style antenna. The old stick with ball antenna was removed and the new blade-style antenna was installed in the same location, then sealed with PRC.
The old coax for the marker-beacon and com antennas was retained but we replaced all the BNC connectors with crimp-type BNC connectors. The assembly was continuity checked for any discrepancies. The whiskers-type navigation antenna was retained but the splitter was replaced with a new one. The cabling from the radio stack to the splitter got new coax and BNC connectors. Any other antennas, no longer needed, were removed and the holes patched or plugged.
Due to the age and condition of the static lines, we just replaced all of the lines and fittings. Each air-pressure instrument got new fittings installed using Teflon tape. The line and fittings are inexpensive but time-consuming to replace. Here is another area that will pay off in the end as the plane will pass a pitot static test for many years to come with no leaks.
All the original green windows along with the windshield were removed and replaced with Great Lakes gray tint windows. The windshield was upgraded to a 0.250" thick windshield. This job is not for the faint-at-heart as it requires drilling out lots of rivets around the windows including the door windows. While the windshield is out, this is the time to finish the avionics and all electrical work. We also replaced the glare shield and got all the lighting working in the new one. Make sure you clearly mark all the formers that have to be removed when replacing the windows. Mark the direction they go and where they fit.
Clean all the formers and the airframe of all sealant that may have been used to install the windows that were removed. Trim and fit each window, allow enough room for expansion and contraction, and do not fit the windows tightly. We install all Cessna non-pressurized windows with 732 RTV. Replacing windows in an airplane is an art all in itself and in this article, we will not go into the process of how to do this job as is very detailed.
We install the windshield base with rivnuts and counter-sink the base fairing for counter-sunk 6-32 machine screws. This way, if the base leaks, it can be removed and resealed as compared to flush riveting or cherry max riveting the base in. The upper portion of the windshield can be installed with counter-sunk 6-32 machine screws on the outside and nylon lock nuts on the inside of the airframe. Do not scrimp on the sealant as it is no fun when you have to reseal a windshield on an aircraft.
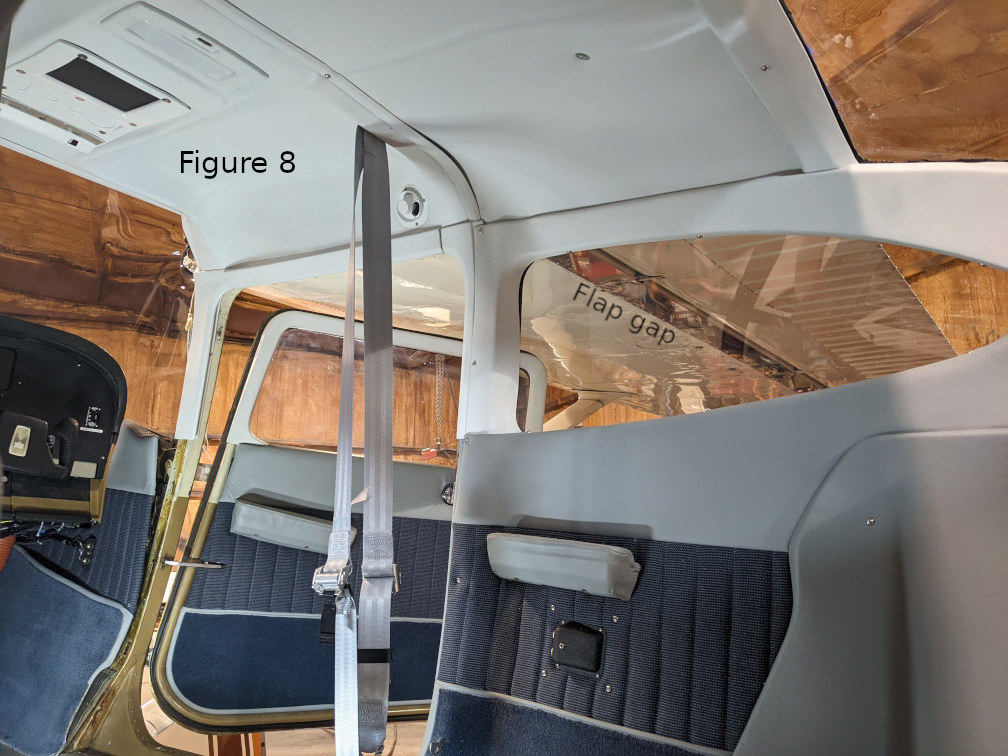
Time to install any airframe modification. We put in a Horton flap gap (Figure 8) and aileron gap seal kit. This is a good kit that will improve slow-speed handling. It is not expensive and relatively easy to install. We also went through the rigging of the ailerons and flaps along with the rudder and elevators. No matter how cool the restoration looks, the job's not complete unless the airplane flies straight with hands-off and feet on the floor.
Once in this airplane's life, it had strobes on the wing tips that someone had removed. We found the correct parts at a salvage yard and with new plastic wing tips the airplane was brought back to its original glory. The elevators, stabilizers, and rudder cap all got new plastic end fairings. The tail cone had been replaced at some time in its life and was reusable. Another kit we installed was the SkyBolt cam lock kit for the cowling. This kit updates the cam locks with the 4002 series stainless steel Phillips cam locks for the entire cowling. Well worth the time and money.
Some minor items needed fixing, like the air box boot hooks. One was broken and had to be replaced with a fabricated steel part. Numerous items were bolted to the inside of the fuselage and all these holes had to be plugged with a new screw and nut.
CHAPTER 5: INTERIOR
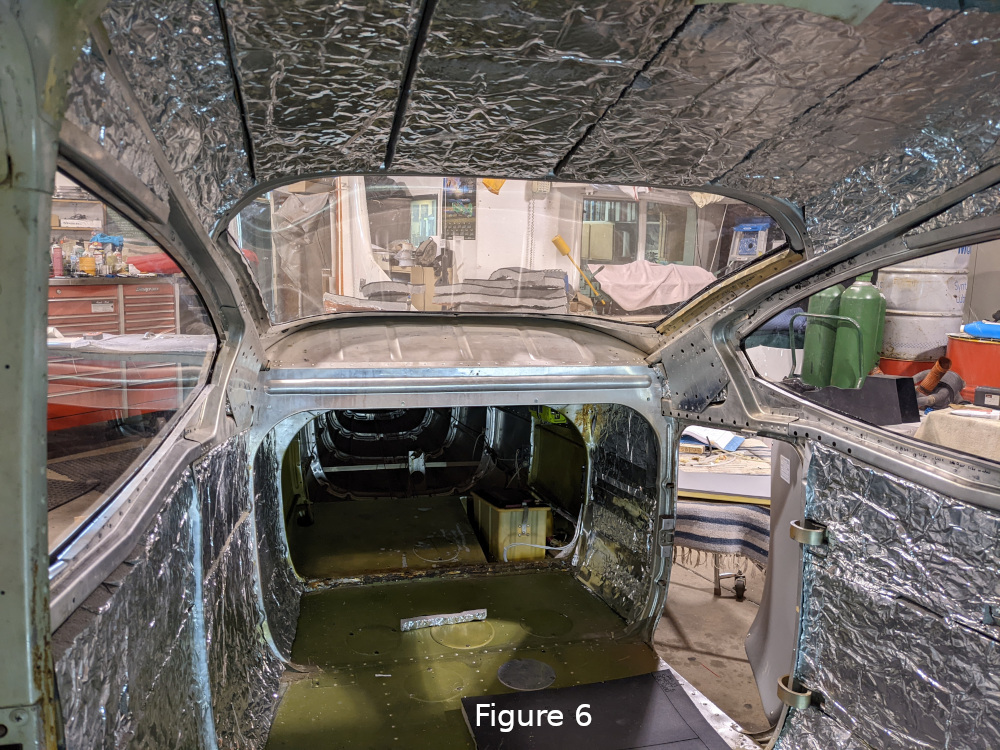
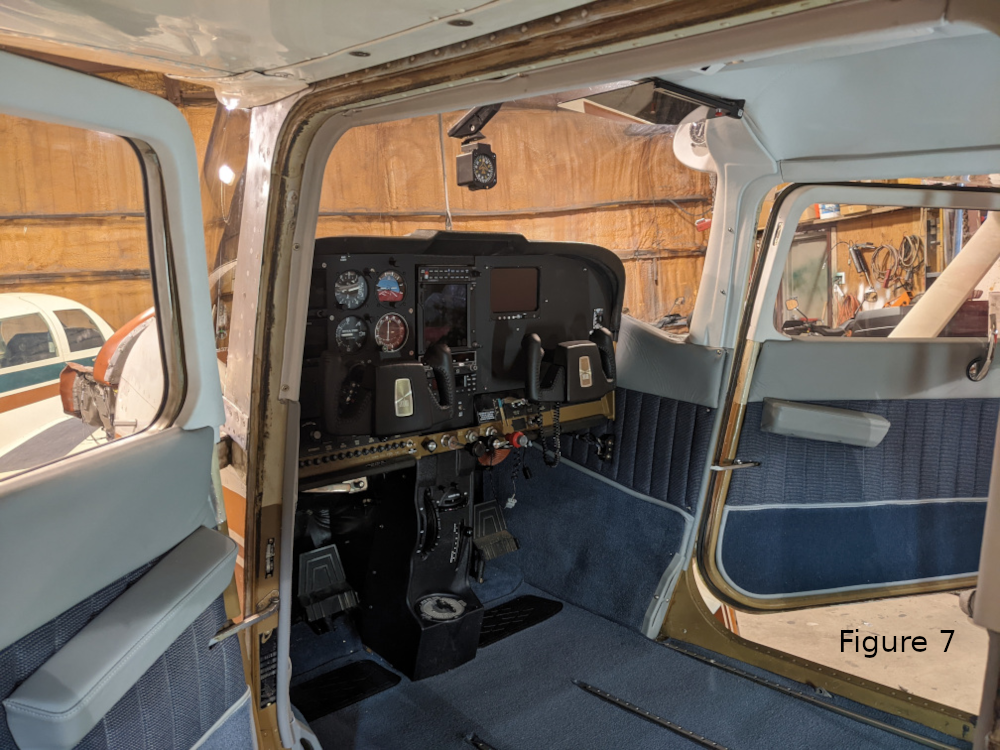
Of course, all the seat covers and foam were shot after 49 years and most of the plastic interior molding were so brittle that they would just fall apart when removing them. Before the new plastic can go in, all the old fiberglass insulation has to be removed and replaced. We put in an Aero Sound insulation closed foam kit (Figures 5 & 6).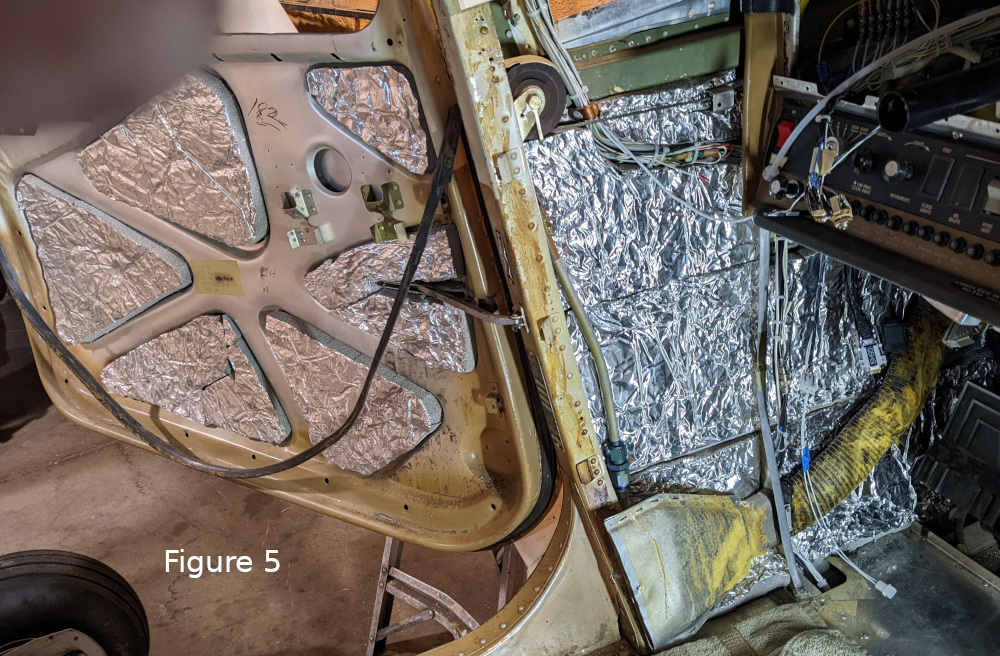
 Once that was installed, new plastic interior parts including the center console and glare shield were purchased from Advantage Plane Parts and trimmed to fit (see Figures 7 & 8). All the upper interior plastic that goes around the windows was covered with a white four-way stretch material. This gives the interior a larger looking space yet it provides a soft space as opposed to the hard plastic look. The headliner in this plane was a foam-formed two-piece unit we had covered in the same four-way stretch white material. We painted the speaker grill satin black to offset all the white. The plane will get painted with a white base and gray and blue stripes so the interior is blue-gray cloth inserts in the center of the seats with a light gray exterior of leather. The carpet is a darker blue which doesn't show the dirt from the ramp. The seat belts were replaced with AmSafe gull-gray restraints. The new interior materials must have a document stating the materials meet FAR 25 fire retardant standards, sometimes known as a burn test document. The restraints must have a TSO data tag as a minimum.
We upgraded the forward restraints to a dual shoulder harness that can be removed in flight without removing the lap belt. This is another one of those areas where you need an STC or a field approval to complete this alteration. Back in the 1980s, the FAA would allow this as a minor alteration as long as the restraints you were installing met the current TSO, but not in today's FAA. We did a Cessna 182 years ago and my structures' DER did all the paperwork and calculations which is now how we must do this on a Cessna 182 with a 337 field approval. Requiring a DER analysis is a shame because there are so many CAR 3 aircraft that could benefit from this safety upgrade. There are two other companies that I know of that have STCs for this upgrade but they don't use this style restraint and we think this AmSafe restraint is far superior to other restrain systems.
Once all the new interior was installed new Rosen sun visors were installed along with all the required placards. At this point, all the avionics, autopilot, new windows, new interior, new instrument panels, and all the STC kits are installed.
CHAPTER 6: FINISH ITEMS FOR AIRWORTHINESS
A new equipment list was completed to reflect all the new items installed and the old list was modified to show all the items removed.
The aircraft was de-fueled and un-usable fuel was put in the tanks. The plane was placed on electronic scales in in-flight level attitude as per the approved Aircraft Flight Manual (AFM). A new empty weight along with a new empty weight center-of-gravity was created. The new weight and balance data were dated to the same date as the new equipment list.
A supplemental AFM was created for all the new equipment operator's instructions and this becomes a part of the permanent records that must be kept in the plane for flight operations. A separate book was created for all the instructions for continued airworthiness. This is not necessary to be in the plane for flight operations. As always all the log books, 337s, and any receipts were organized into a 3-ring zippered notebook (see log book organization article we wrote for MAPA magazine or at our website, KNR-inc.com).
All the 337s (7 total) were sent to Oklahoma city FAA AFS 750 along with all the STCs and AML lists. Last, but not least, an annual was completed and flight testing was completed. Once the plane was considered airworthy, it was turned over to the owner for him to fly and write down any squawks he may find.
CHAPTER 7: PAINT
KNR does not paint entire aircraft as that is a real specialty job, but I can advise you how to get a quality paint job that will be beautiful for decades.
First, choose a quality aircraft paint shop. This will include complete paint striping including the door jambs. This will entail removing all the control surfaces and cleaning out all debris from the paint removal process. Now painting an airplane is nothing like painting a car. For instance, there is more paint on one wing of a plane than on a full-size auto. Another difference is that all the control surfaces must be balanced after painting per the aircraft manufacturer's specifications. If the plane has static wicks installed, these must be in good condition or replaced as necessary.
Most aircraft paint shops do not use a base coat/clear-coat process as used in automotive paint. They will use a modified enamel-like Jet Glow or a PPG system that has the clear-coat built into it. These types of paints hold up well in the sun and environment. They can be de-oxidized and or buffed out but one must be careful to not grind down the round head rivets with the buffer. This is just another difference from auto paint.
All the installation and balance of control surfaces must be signed off by an A&P mechanic. The paint and strip itself do not require an A&P sign off but a log entry should be made with the type of paint and colors applied. Typically the FAA will not require a new weight and balance done as they consider the paint removed to be the same weight as the paint applied. When deciding on your interior colors be sure they will work with the new paint colors.
Often we have paint shops put a chrome illusion stripe on as one of the outside stripe colors. This is sometimes called chameleon paint as it changes colors based on the angle that light reflects off of it. If you decide to do this, make sure that the paint is outlined in 1/8 or ¼ inch gloss black stripes. This will separate the chameleon paint from the base color; it really stands out. This is not cheap to do, but a typical 3-color strip and paint on a single engine 4-place airplane is 15K-18K, so what's another $3K for your plane to stand out in the crowd?
If you have wheel pants, have the paint shop repair and repaint them to match your plane. This little detail will really finish the paint job.
If you decide to do all the items listed in this article you will need to budget 120K in 2022 dollars. For a gallery of all the photos from this restoration, click here.
As with all ShopTalk articles feel free to e-mail me at ShopTalk@knr-inc.com or call my aircraft repair shop (307) 789-6866. Until the next ShopTalk, enjoy flying your better-than-new Cessna.