
Ice, Ice, Baby - TKS Anti-ice
ShopTalk - December 2018
This month, ShopTalk will melt your heart with tales of repair, care, and some history of the TKS ice protection system on piston-engine aircraft. You may not know this but slight damage to the TKS panel with no subsequent airframe damage can set you back 5 grand or more! First, a little history.
Back in 1978, when I got into general aviation, almost all de-ice and known-icing light aircraft were protected by inflatable rubber boots that were glued to the leading edges of the wings, horizontal stabilizer, and vertical fin. These boots had ribs in them that would inflate to break off the ice. The engine would have a pressure pump and valves that would cycle the boot(s) inflation on and off.
The prop was protected by electric heating boots glued to the root of each blade with a timer to cycle, on and off, or an alcohol slinger ring with small tubes to each blade. A separate tank and pump were utilized to push alcohol to the slinger ring. The fluid would squirt out onto a rubber boot glued on each blade leading edge near the root of the blade via centrifugal force.
Forward visibility in icing conditions was maintained by heating all or a portion of the windshield or an alcohol spray bar located at the base of the windshield. On some twin-engine planes, the pilot’s windshield had a transparent evaporated gold layer on one of the internal laminate layers, an electric heating element. These windshields were very expensive to replace if damaged (over $30K in the ‘80s). A less expensive solution was a heated transparent pane that was attached to the airframe in front of and leaning parallel against the windshield. The pilot looked through both the windshield and the hot pane. These were somewhat common and more affordable compared to the gold tint windshields.
Also, back in the ‘70s, it was commonplace to patch the rubber airframe boots if they got damaged. There was a limit to how much damage (size-wise) and how many patches could be on each boot. In some cases, one just had to peel the old boot off and throw it away. Cleaning the wing of all the old glue and re-gluing a new boot was time-consuming, but not terribly difficult.
Except for the evaporated gold, these technologies were developed and mostly perfected prior to and during World War II. Another WWII technology, the subject of this ShopTalk, is TKS. By studying its history, we can also suss out the main TKS components.
- T - Tecalemit Ltd. manufactured metering pumps for lubrication systems. The company designed and produced multi-outlet pumps and filters for the system.
- K - Kilfrost Ltd. specialized in de-icing chemicals. They were instrumental in getting the British War Ministry to adopt the technology.
- S - Sheepbridge Stokes Ltd. produced the newly invented sintered powder metal components. The company manufactured de-icing strips for bomber leading edges. A more detailed history may be found at
- TKS was developed by three different British companies during WWII, which lend their initials to form “TKS”.
caviceprotection.com/company/history Of course, back then, they could not laser drill the leading-edge airfoils like they do today. Laser drilling wasn't developed until the late 1970s.
Today’s TKS airfoil panels are actually two components that sandwich an open-cell membrane. The inner panel is glued to the back of the outer panel using fuel tank sealant with the open cell membrane in the middle. The inner panel will have multiple fittings on it that nylon hoses carrying TKS fluid under pump pressure will attach to. The TKS tank and pump(s) will be typically located in the fuselage near the center of gravity. A very fine filter will be between the pump(s) and the leading edge airfoils so no debris can get pumped to the airfoils. The TKS fluid is composed of ethylene glycol, isopropyl alcohol, and distilled water. Under pump pressure, the membrane cells will fill up; eventually, TKS fluid will flow (weep) out of the laser-drilled holes on the titanium leading edge airfoils. This anti-ice fluid will then coat the wing and control surfaces keeping ice from forming on the aircraft. At the same time, TKS fluid is pumped to the slinger ring on the prop and flung out via centrifugal force onto the prop blade boots preventing ice from forming on the prop or cowlings.
One item I see often is a TKS system installed with a hot prop. Folks, this will not keep the engine running in moderate icing conditions. You must have the TKS slinger ring directing fluid pumped to the prop blades to keep the engine running and the props thrusting during icing conditions. You see, the TKS fluid is not just flinging out onto the prop blades but is also covering the engine cowling (and even the windshields). This also helps to keep the engine air intake from icing up and blocking the engine air filter, alternate air notwithstanding.
The last TKS component is the windshield spray bar; a pretty handy item to have, especially while landing!
Another item of importance is the deice light that is mounted in the fuselage just forward of the pilot side instrument panel. This light, when turned on, will shine out onto the left wing leading edge so one can tell if ice is forming on the left wing.
The TKS pump(s) are located in the fluid tank and the pilot control panel will have a three-position switch to run the pump(s), basically a high and low position along with an off position. The flight‑into‑known‑icing (FIKI) systems will have 2 pumps in case one fails. All the other TKS systems with only one pump are not certified for FIKI.
Some of the drawbacks to having a TKS equipped Mooney are: Your plane will be slower than a non-TKS airplane of the same model, about 7-9 knots. You will lose some useful load. The weight of the airfoil panels, tank, pumps, and 6 gallons of fluid all add up (91 lbs.). The upside, of course, is you can fly through ice layers to get safely to your cruising altitude (and back down again) with no worries of deviating. I have always thought that single-engine flight‑into‑known‑icing was a bit of an oxymoron, kind of like jumbo shrimp or maybe military intelligence, but the FIKI TKS system works and works well.
Recently, one of my FIKI Mooney TLS customer's aircraft was bumped by a tug on the leading edge of the right wing TKS panel. This damage was small (about the size of a dime) but unfortunately very significant. To keep the anti/de-ice capabilities, TKS fluid must flow out of all the laser-drilled holes and this damaged area was dry when the system was turned on. To maintain the value and the airworthiness of the airplane, the panel had to be replaced.
The airfoil panels are glued onto the wing using fuel tank sealant. The airframe leading edge is drilled in multiple places to attach the TKS hoses to the TKS airfoil. Removing the damaged airfoil without damaging the wing or paint is the real trick here. Two different auto-body tools, along with a rivet gun, are used to break the fuel tank sealant that bonds the TKS airfoil to the wing (Figures 1 & 2).
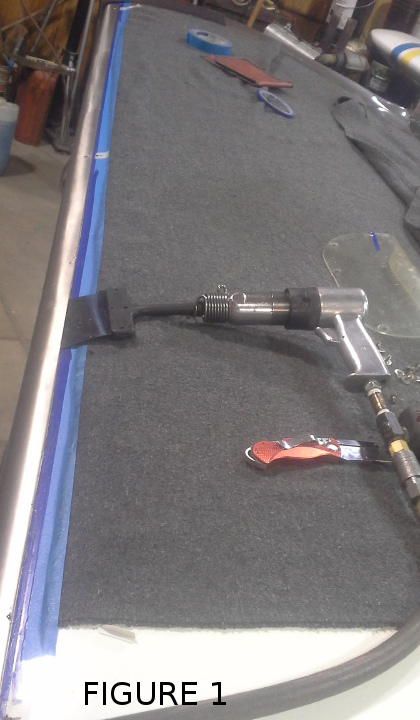
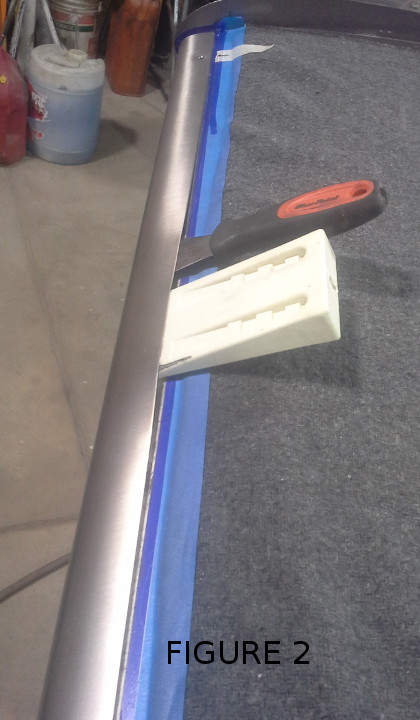
Once this bond is broken, the TKS airfoil panel can be removed. Cleaning the wing of old fuel tank sealant and prepping the wing for the new panel is important to get a good bond between the new TKS airfoil panel and the wing.
Now that the airframe is clean, the new TKS airfoil panel must be cleaned. Because you do not want any type of solvent getting into the membrane, mild soap and water are used over the areas where the laser-drilled holes are. This is how you are to clean your TKS panels when they are dirty. Never use a steel brush or any other harsh tools on these panels. Do not use anything that will clog the laser-drilled holes, such as wax or solvents that may be absorbed by the membrane. If you have someone waxing or polishing out your plane, be sure to mask off all the TKS panels before starting the work. Also, to maintain the membrane in good condition, run the system once a month. This will keep the membrane filled with TKS fluid and pliable.
When installing the new TKS airfoil panel, make sure the orientation of the panel is in line with the airfoil panels on the wing, not pointed down or up but in alignment with the existing panels. When you look at the photos that accompany this article one can see how much the airframe is masked off so as to protect the paint.

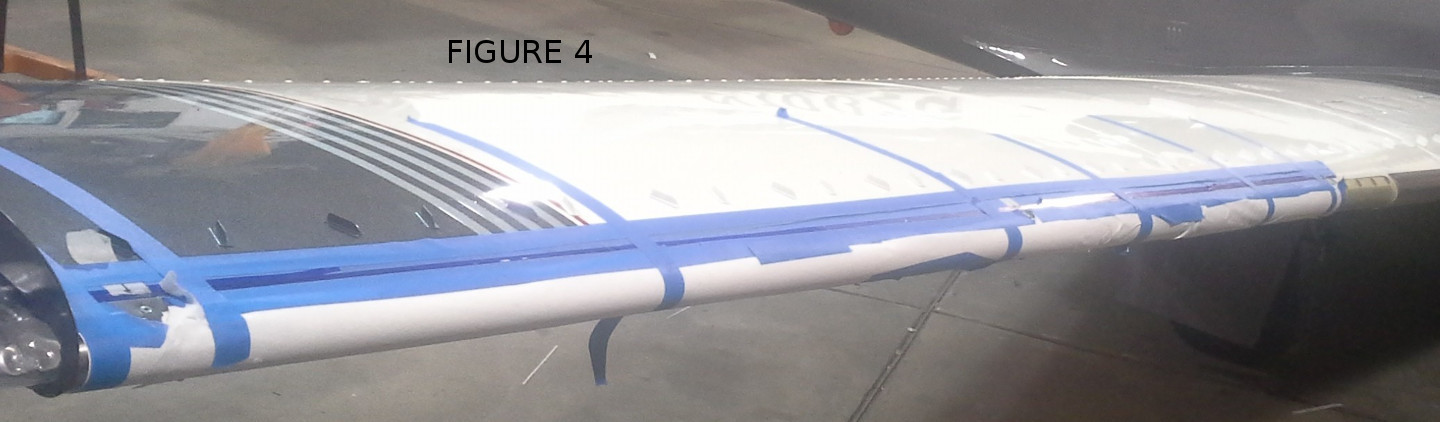
Place a line of fuel tank sealant about the diameter of one’s index finger onto the new TKS airfoil panel top and bottom, along its entire length. Now is a good time to attach the TKS fluid lines to the new panel (Figure 3). You can’t get to them once the new panel is installed. Press the new TKS airfoil panel onto the airframe maintaining proper alignment on the wing and mask it onto the wing to keep it in place while the fuel tank sealant sets up (Figure 4). The ends are sealed with tank sealant or RTV.
Allow 2-3 days for the fuel tank sealant to properly cure before removing the masking tape holding the new panel tight against the existing wing leading edge. Once all the masking is removed, run the TKS system to verify your new panel is weeping fluid from all its laser-drilled holes. Because the new TKS airfoil membrane is dry this will take up to 10 minutes to fill the first time. So, what will the replacement of a TKS airfoil panel for one wing cost? The panel is over $4,000 by itself, with about 20-25 man-hours labor to complete the job. This is a 6-7 thousand dollar experience, so be cautious!
- If you have questions about this or any other ShopTalk article, please e-mail me at shoptalk@knr-inc.com or call me at my aircraft repair shop, 307-789-6866. All ShopTalk articles can be read here at
- Until next time, enjoy flying your Mooney.